Saturday, May 28, 2011

Dog Bed Upcycle?

I love my pets, but at the end of the day and the end of my budget we have to sometimes get creative with their items. At almost 90 pounds of lovable lap dog, our princess Joi Boo, tracks in a fair share of muck.

We have been reusing the stuffing from the same bed for the last 2 years, and replacing the outside by buying the couch cushion covers from the Ikea as is bins. Blessed with out a flea problem, all we had to worry about was the dirty cover. 
However, keeping the floor plan as open as possible to ensure easy wheelchair access has been one of the challenges. I purchased a black dog bed cover last month for a whopping $2.00 at Ikea. It looked plenty big in the store, but once home and stuffed with only half of the dog bed stuffing our Boo could not fit on it. And she was not pleased one bit. 

I decided to toss the old stuffing and opt for using a queen size fleece blanket from our bed. It has been used for several seasons and no longer was as snuggly as I like them. 

Pulled from the Goodwill pile, I folded it in half length wise and then in thirds to get a overall space of 2ft x 3ft. Just enough space for Boo to lay and play with yogurt containers. (another bit of a reuse, she will clean them and then carry them around  but will not put them in the recycling bin) Knowing dogs like to ruffle up on beds and paw up the blankets, I knew this needed a cover or I would be constantly folding the bed back up. 

I grabbed one of the small fleece blankets from a the closet and created a no-sew cover by cutting 1 inch strips and knotting them on the 2 shorter ends. This left one end open, and makes this bed very easy to wash in our small washing machine. 

By reusing a few items that have been kicked around here, I was able to build this bed for Boo in less than 20 minutes. 

Thursday, May 26, 2011

Sellwood Columbia outlet store---SCORE!

A shout out to my Mom for driving me there!

We went yesterday and found a few clearance racks with an additional 50% off of lowest price.
I spotted the trench rain coats at retail stores and have been wanting them, perfect for the rainy Pacific NW and our regular visits to the beach.
Here is my rundown.
Color print trench style rain coat (original price $115.00) paid $13.50
Black and white trench style rain coat (original price $115.00) paid $13.50
Girls Pink reversible sweater (original price $60.00) paid $9.00
White and blue tee (original price $36.00) paid $5.30
Full price I would have never pick up this stuff ($326.00)
But with the discounts I left with only $41.30 coming out of my wallet.

Not sure how long the sale will last, but it is a steal if you have been wanting to add a really stylish rain coat to your wardrobe.

Plans do get delayed...part 1

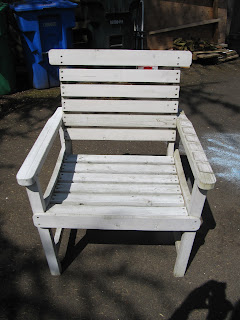
Here is my first of many projects.
We purchased this chair as a set with a little insert/table.
My original intentions were to paint them and have them on my porch, well life happened and they sat outside and unused for not 1 year, but 3 years. Clearly they needed a bit of cleaning before i could get started on the beautifying part. So I set off with my mini sweeper and some tiny brush that came with a pedicure set I got 10 years ago. 
Did I mention that I do things as frugally as possible, otherwise it seems like a waste to throw money at fixing things up. 
So once all the pine needles were out, spider webs and built up dirt were gone, I busted out my trusty sander and gave it a good once over. 

I decided to skip primer, because I was feeling too lazy to get it from the garage. MISTAKE 1. 
4 coats later and I still had some of this....
MISTAKE 2, painting in the grass....it was sunny and warm outside so I don't regret it, but there were added challenges.


But with all my spare time I was able to splash 2 more coats of green on. 


But with all my spare time I was able to splash 2 more coats of green on.

Now I have one finished seat! I am waiting till the set is done to buy some pillows, thinking magenta?

Tuesday, May 17, 2011

Welcome to my online spot!

Hello All! I have been very busy scrolling through craft blogs and LOVING all the fun projects. I have a bookmark list a mile long of fun projects I want to do.
So I decided to start my own little DIY spot here to share my success, failure, changed plans and fun deals with the world.

I am taking up home in the wet and often gray Pacific NW, and my projects are all geared at bringing color and new life to what I have on hand or find on the cheap.

Stay tuned, I will have some finished projects to share soon